I started out by ordering three dozen 1/2" nursing bra clasps in beige, black, and white from Sew Sassy. I also ordered 3 yards each of 1/2" plush elastic in those same colors (at the time I placed my order, the strapping elastic in that size was only available in white, so the black and beige finishing elastic that I got has a picot edge trim on one side -- not a big deal.) I figure this should last me through many more years of nursing.

The ubiquitous "T-shirt" bras that have plastic rings above the cups are ideal for this transformation. If this is the type of bra you have, start by unpicking the stitching at the top of the bra cup. (If your bra doesn't have a ring between the cup and the strap, I address that at the end of the tutorial.)

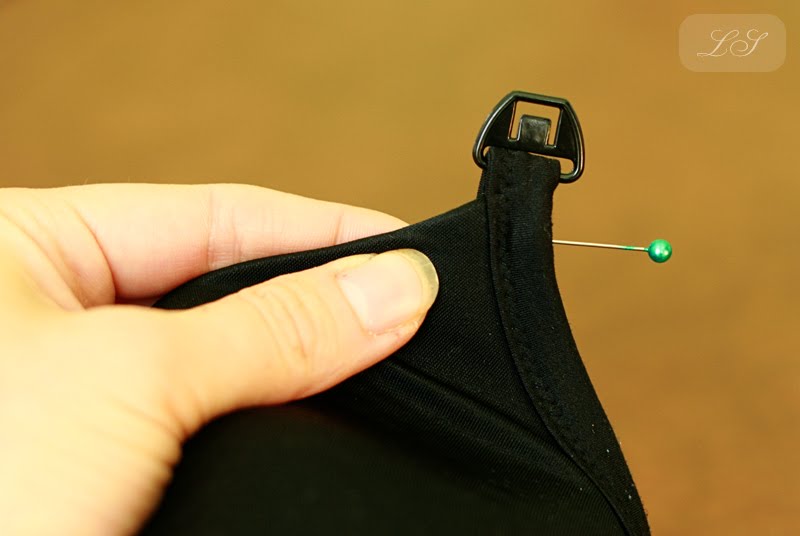
Next, unpick the stitching behind the slider on the strap, where shown.

At the top of the bra cup, slide on the bottom half of the nursing clasp and pin in place. Zig-zag stitch where you previously ripped out the stitching, catching the loop in back. (For all machine sewing involved in this tutorial, I generally stitch, backstitch, and stitch again, for extra strength.)

Take the top of the elastic strap out of the slider, releasing the plastic ring, and slide it through the top of the nursing clasp (making sure it's facing the correct direction). Re-thread the elastic through the slider and re-stitch where you previously unpicked the thread, as shown. (Don't be like me; make sure you're stitching the correct two bits of elastic together. Yes, I had to do some ripping out during the making of this tutorial!)

Next, thread some elastic through the bottom of the top nursing clasp, as shown. (If you are using a plush elastic, make sure the soft side will be facing your skin.) Stitch in place.

Hook the nursing clasp together. (Don't be like me; make sure the strap is not twisted.) Now, this next part is a bit hard to describe, but just use your fingers to guide the elastic down to the bottom of the bra, where the cup meets the back (as shown). Don't stretch the elastic or make it too loose, you just want it to fit the inside of the bra cup. Pin the elastic in place.

On the outside of the bra cup, stitch in the ditch where the elastic is pinned. A zipper foot will be helpful here.

Then go back to the inside of the cup and trim the elastic close to the stitching. Use a little Fray-Check, if you like. All done!
Now, if your bra doesn't have that handy plastic ring, you can still probably convert it. This bra just had a continuous strap from cup to back. First cut the strap about 1" above the cup, then put the bottom half of the nursing clasp on the strap and fold it to the back to create a loop. Stitch in place.

If you don't mind sacrificing some of the length of your bra strap, you can just do likewise to the top part of the strap. However, if you want to keep its maximum length, cut a short length of elastic or ribbon to create a loop. Thread the top of the nursing clasp through the elastic, then sandwich the cut end of the strap between the ends of the elastic loop. Stitch in place, then proceed as in the tutorial above.
I hope you find this useful! I've been "test-driving" the models and they are super-comfortable. I can't feel the elastic inside the cup at all. Vive la breastfeeding! ;-)
 I'm a 31-year-old Christian. My hope is to live a quiet life filled with home and hearth, family and friends, loveliness and simplicity. I'm wife to Douglas (married October 2008) and mother to Edmund (born November 2009), Lavinia (born May 2012), and Rosamund (born February 2014).


I can't tell you how grateful I've been for your tutorial! It saved me an arm and a leg on nursing bras with my first (decent nursing bra, $25-$50; converted Warner's T-shirt bra from Ross, $6-$8!), and is continuing to do so with my second baby. Plus, it's really hard to find non-underwire nursing bras for some reason, so being able to convert my own is fantastic.
ReplyDeleteThe nice thing is, once you have a stash of clasps, you can recycle them when the bra wears out. I'd made all of mine with the extra strap piece that you included in this tutorial; it's such a help for keeping everything in place!
Good for the wallet, and good for the baby! Thank you for being both clever and helpful! :-)
Blessings,
Shannon
Hi Laura,
ReplyDeleteI was just on Deep Roots at Home and saw your pictures. Seems like others are appreciating your flair with apparel! Pam
Shannon, I'm so glad it was helpful to you. I'm not sure why I used the type of clasp I did in my first tutorial, but you and Janel (and hopefully some others!) were able to at least take the idea and improve on it. :) True nursing bra clasps are better in that they allow for that extra elastic strap, plus my old clasps kept snapping all the time and I'd have to replace them! Ugh! I'm hoping these ones will be a little more sturdy, and then I can recycle them as needed, as you say.
ReplyDeletePam, how neat that you read Deep Roots at Home, too! Jackie is a friend of mine from Indiana days. The Internet makes the world seem smaller, doesn't it... :)
Yes, I read Home Living. It was a link at that site that led me to Deep Roots at Home. I actually responded to one of her posts because she had pictures of sand hill cranes. I thought she might live around here. Yes, isn't just amazing what the internet can do? I am grateful for all of the inspirational homemaking blogs. If I need a little incentive, I read a good blog, then I get to work! Hope all is well. I actually have a question for you next time I see you all. Pam
DeleteI will forever be grateful for your first tutorial, which completely made my day, my week, and my entire nursing experience SOO much better! I remember being rather sad and dismal about the whole "non-cuteness" and expensive thing for nursing bras, and when I found your tutorial, my mood changed in an instant. Thank you ever so much! :)
ReplyDeleteThis is brilliant! Thanks for sharing!
ReplyDeleteOh my goodness, thank you for this tutorial! With baby #1 I was a non conventional size and had to pay $69/nursing bra. With this, I will be able to convert less expensive ones while I'm now expecting #2 and still an unconventional size.
ReplyDelete