Thursday, January 17, 2013

Reading with Little Ones


Winter is a good time to snuggle up on the couch with the kids and do some fun reading. Lavinia is not as interested as Edmund yet, obviously, but if I give her something to suck or chew on, she will generally sit beside me contentedly while I read aloud several books.

One of my favorites is a book I had as a child, A Great Big Ugly Man Came Up and Tied His Horse to Me. My copy was pretty beat up, but I found one in pristine condition at a library book sale many years ago and saved it for my future kids. Now this one is getting beat up, but that's OK. It's full of fun and silly nonsense verses, but I've always loved the illustrations the most. Wallace Tripp has a wonderful, humorous, whimsical style that will capture kids' attention, but is also amusing to adults. There are humorous details scattered throughout the pages that I never picked up on as a child, but now as I read the book to my kids I can enjoy them. (For instance, he seems to have a "thing" for English composers?! There's actually a caricature of Ralph Vaughan Williams and Edward Elgar on the very last page, worked into the illustration, that I only recognized two years ago when I was reading the book to Edmund. Wow.) Children's books that can simultaneously entertain both kids and adults are the absolute best!

I looked on Amazon, where even used versions were selling on the pricey side, so you might instead want to check your local library to see if you can get your hands on this great book!

Monday, January 7, 2013

"Snowy Midnight" Sencha blouse


"Snowy Midnight" Sencha blouse

I made up a wearable muslin of Colette Patterns' Sencha blouse last month, out of some dark blue polyester crepe left over from one of my early sewing projects. Nowadays I wouldn't choose polyester, as it's rather annoying to sew with, but this leftover length was just sitting in my stash, so why not use it up? It gave me the chance to try out the fit and style. It feels a little loose; I've probably lost a bit more postpartum weight from the time I cut it out in November until now.

"Snowy Midnight" Sencha blouse

As I mentioned, polyester is not particularly fun to sew with, so next time I would choose rayon, silk, or a drape-y cotton. Another note for next time: I will hand-sew the hem, as the machine-sewn hem doesn't drape very well. Otherwise, I really like the style -- the keyhole neckline with ties is sweetly retro. Douglas gave me a new pleated skirt for Christmas, which goes perfectly with the top. Love it!

Thursday, December 20, 2012

The first snowman

We were planning to drive to my in-laws' home for our Christmas vacation today, but a snowstorm yesterday afternoon closed the Interstate all day long. (Douglas commented, "You know you're in Nebraska when the winter is mild up until the day before vacation, when a foot of snow closes the interstate for 500 miles.") Although it was disappointing to have our plans thwarted, it ended up being kind of pleasant to have a relaxing day at home. After lunch, Edmund and I bundled up and headed outside to make his first snowman! Well, I did most of the work while Edmund observed, but still. I found a nice, long icicle hanging from the garage to make a nose, vintage buttons for eyes, and a red pipe cleaner for the mouth. I haven't made a snowman in who-knows-how-long, so I enjoyed the snowy fun just as much as Edmund did.


After Edmund went down for his nap, Douglas and I played Carcassonne while enjoying some coffee and Christmas cookies. (I put eggnog in my coffee, mmm!) I am finally getting the hang of that game because I've won four times in a row, whereas when we first got it, Douglas won the first nine games we played. (We're kind of board game nerds and keep track of who won, when and where we played, and other pertinent details by writing it all down on the top of the game lid.)

What are you looking forward to during your Christmas break?

Monday, December 10, 2012

A Jesse Tree


Now that Edmund is three, we wanted to start some more meaningful Christmas traditions within our family. My mom did a Jesse Tree with my brother and me one year when we were kids, but for some reason it didn't become a yearly tradition. I remembered and liked the idea, however, and so this year I found a set of ornaments from Etsy seller Inspired Traditions. (If you are unfamiliar with the meaning of a Jesse Tree, she provides a good explanation in her ornament listings.)

The ornaments come with a little booklet that explain each symbol and give suggested scripture reading, so we've been doing that each morning at breakfast. The ornaments are simplistic, just little wooden discs hung with twine, with colorful but plain symbols on each one. The illustration style reminds me of what you might see on banners and cloths in more traditional churches. I like the visual symbolism, and it's certainly easier for a toddler who can't read yet.

My mom donated a four-foot Christmas tree that she wasn't using, so Edmund has his own little tree. It's nice that he can decorate it however he wants and I don't worry if he takes ornaments off and puts them back on, or if they're not hung in a very picturesque fashion. I think this will make a really lovely addition to our family Advent traditions in years to come.

Wednesday, December 5, 2012

"The Lamb"

I'm greatly enjoying all my Christmas music and I've been pulling up a few favorites on YouTube, too. I can't embed this one, but I can send you over to YouTube to see the King's College choir perform John Tavener's setting of William Blake's poem, "The Lamb." I rather enjoy the slightly bizarre quality of the music; it matches up with my mental image of William Blake.

Wednesday, November 21, 2012

So thankful

You know what, I am not a particularly grateful person by nature. It's easy for me to dwell on the negatives (part of why I started this blog many years ago; to help me record God's blessings in my life -- which I hope to get back to more and more). Feeling thankful doesn't come easily, so I have to choose to be so, sometimes on an hourly basis. When I am feeling resentful and ungrateful, it's not because God hasn't given me good things or provided for my needs, it's because He hasn't done it the way I want Him to(!). What foolishness.


I do actually have a lot to be thankful for. I'm thankful for the memory of a special Thanksgiving day, three years ago, when our firstborn son entered the world. He has been a delight to us ever since. I'm thankful for his good health, his quick mind, his sweet spirit, and yes, even his boyish energy. :) I wanted a son named Edmund and God graciously gave me the desires of my heart. He is so hilarious; I can't even tell you all the funny things he says that crack me up! Here are a few recent funnies:
  • At naptime, I put him down in his crib and covered him with his blankets. He looked up at me and sweetly asked, "Mommy, where are my pocket-handkins? Where's my pinnie?" (The Tale of Mrs. Tiggy-Winkle reference, for those of you who are too far removed from Beatrix Potter books.)
  • the other day at lunch: "On your marks... get set... GO! PRAY! Lord Jesus, thank you for this day..."
  • I was walking past the (closed) bathroom door and heard a little voice inside practicing the "Minuet in G": "La, de, da, de, da, de, da, de, da. La de da. La de da." etc. He was using the Think System from The Music Man, hahaha.

I'm thankful for our lovely daughter, who just turned six months old. I can't wait to see the beautiful person she will become. I am also thankful for her good health and her sweet temperament. She charms people everywhere we go with her ready smile. We're often asked, "Is she always this happy?" (For the record, no.) She has the cutest mannerisms, from sucking her thumb to making adorable "ba ba ba" noises to squirming and dancing in the most fetching way. What a sweetheart!

I'm thankful for my husband, who has worked so hard to provide for our children and me. I'm proud of the steps he has taken to create his own business, and amazed at his multiple talents in creating websites, brochures, marketing, creativity, etc.! That on top of his talents as a musician and a teacher. He has stretched himself out of his comfort zone (and mine) again and again, all for the sake of his family. He keeps persevering in the face of setbacks and discouragement. What a man! He is my best friend. He is the funniest guy I know -- once in a while he'll come up with something that has me literally crying uncontrollably with laughter. That's a good feeling.

There's more, but I'll stop there and keep the rest in my heart (or for another blog post). ;-) I wish you a wonderful Thanksgiving meditating on God's blessings!

Thursday, October 25, 2012

New and Improved DIY Nursing Bra Tutorial

I recently had to convert another batch of bras to nursing bras and I felt I could improve upon my last tutorial, which I made shortly after Edmund was born. Since I posted it, I've had some lovely and excited e-mails from ladies who have found it to be helpful. Janel of Simply Nel told me how she added elastic to the strap and cup to keep it in place, which makes the bra more like a store-bought nursing bra. I thought it was a great idea and I'm sure you'll agree. Here's the revised, and I think, much-improved tutorial!

I started out by ordering three dozen 1/2" nursing bra clasps in beige, black, and white from Sew Sassy. I also ordered 3 yards each of 1/2" plush elastic in those same colors (at the time I placed my order, the strapping elastic in that size was only available in white, so the black and beige finishing elastic that I got has a picot edge trim on one side -- not a big deal.) I figure this should last me through many more years of nursing.


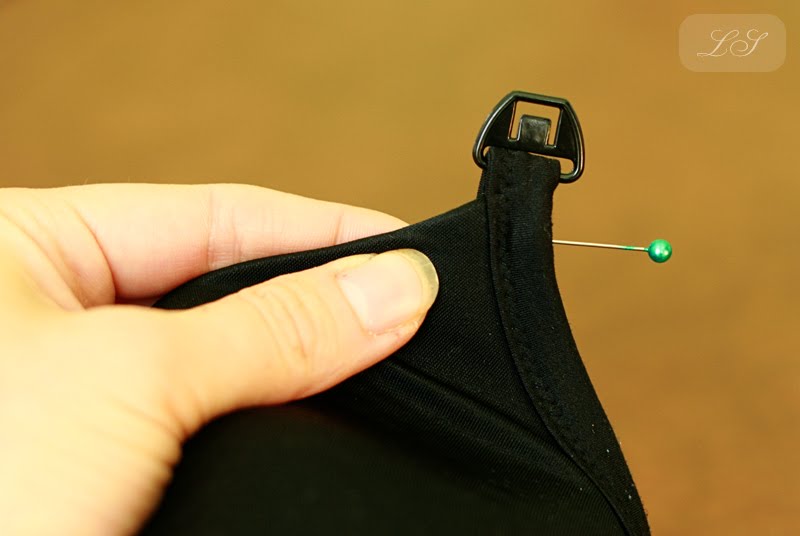
The ubiquitous "T-shirt" bras that have plastic rings above the cups are ideal for this transformation. If this is the type of bra you have, start by unpicking the stitching at the top of the bra cup. (If your bra doesn't have a ring between the cup and the strap, I address that at the end of the tutorial.)


Next, unpick the stitching behind the slider on the strap, where shown.


At the top of the bra cup, slide on the bottom half of the nursing clasp and pin in place. Zig-zag stitch where you previously ripped out the stitching, catching the loop in back. (For all machine sewing involved in this tutorial, I generally stitch, backstitch, and stitch again, for extra strength.)


Take the top of the elastic strap out of the slider, releasing the plastic ring, and slide it through the top of the nursing clasp (making sure it's facing the correct direction). Re-thread the elastic through the slider and re-stitch where you previously unpicked the thread, as shown. (Don't be like me; make sure you're stitching the correct two bits of elastic together. Yes, I had to do some ripping out during the making of this tutorial!)


Next, thread some elastic through the bottom of the top nursing clasp, as shown. (If you are using a plush elastic, make sure the soft side will be facing your skin.) Stitch in place.


Hook the nursing clasp together. (Don't be like me; make sure the strap is not twisted.) Now, this next part is a bit hard to describe, but just use your fingers to guide the elastic down to the bottom of the bra, where the cup meets the back (as shown). Don't stretch the elastic or make it too loose, you just want it to fit the inside of the bra cup. Pin the elastic in place.


On the outside of the bra cup, stitch in the ditch where the elastic is pinned. A zipper foot will be helpful here.


Then go back to the inside of the cup and trim the elastic close to the stitching. Use a little Fray-Check, if you like. All done!


Now, if your bra doesn't have that handy plastic ring, you can still probably convert it. This bra just had a continuous strap from cup to back. First cut the strap about 1" above the cup, then put the bottom half of the nursing clasp on the strap and fold it to the back to create a loop. Stitch in place.


If you don't mind sacrificing some of the length of your bra strap, you can just do likewise to the top part of the strap. However, if you want to keep its maximum length, cut a short length of elastic or ribbon to create a loop. Thread the top of the nursing clasp through the elastic, then sandwich the cut end of the strap between the ends of the elastic loop. Stitch in place, then proceed as in the tutorial above.

I hope you find this useful! I've been "test-driving" the models and they are super-comfortable. I can't feel the elastic inside the cup at all. Vive la breastfeeding! ;-)