Thursday, October 25, 2012

New and Improved DIY Nursing Bra Tutorial

I recently had to convert another batch of bras to nursing bras and I felt I could improve upon my last tutorial, which I made shortly after Edmund was born. Since I posted it, I've had some lovely and excited e-mails from ladies who have found it to be helpful. Janel of Simply Nel told me how she added elastic to the strap and cup to keep it in place, which makes the bra more like a store-bought nursing bra. I thought it was a great idea and I'm sure you'll agree. Here's the revised, and I think, much-improved tutorial!

I started out by ordering three dozen 1/2" nursing bra clasps in beige, black, and white from Sew Sassy. I also ordered 3 yards each of 1/2" plush elastic in those same colors (at the time I placed my order, the strapping elastic in that size was only available in white, so the black and beige finishing elastic that I got has a picot edge trim on one side -- not a big deal.) I figure this should last me through many more years of nursing.


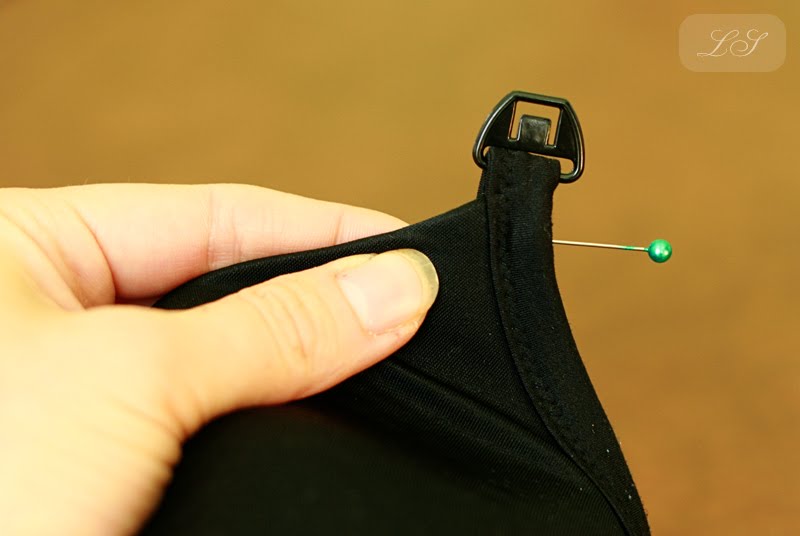
The ubiquitous "T-shirt" bras that have plastic rings above the cups are ideal for this transformation. If this is the type of bra you have, start by unpicking the stitching at the top of the bra cup. (If your bra doesn't have a ring between the cup and the strap, I address that at the end of the tutorial.)


Next, unpick the stitching behind the slider on the strap, where shown.


At the top of the bra cup, slide on the bottom half of the nursing clasp and pin in place. Zig-zag stitch where you previously ripped out the stitching, catching the loop in back. (For all machine sewing involved in this tutorial, I generally stitch, backstitch, and stitch again, for extra strength.)


Take the top of the elastic strap out of the slider, releasing the plastic ring, and slide it through the top of the nursing clasp (making sure it's facing the correct direction). Re-thread the elastic through the slider and re-stitch where you previously unpicked the thread, as shown. (Don't be like me; make sure you're stitching the correct two bits of elastic together. Yes, I had to do some ripping out during the making of this tutorial!)


Next, thread some elastic through the bottom of the top nursing clasp, as shown. (If you are using a plush elastic, make sure the soft side will be facing your skin.) Stitch in place.


Hook the nursing clasp together. (Don't be like me; make sure the strap is not twisted.) Now, this next part is a bit hard to describe, but just use your fingers to guide the elastic down to the bottom of the bra, where the cup meets the back (as shown). Don't stretch the elastic or make it too loose, you just want it to fit the inside of the bra cup. Pin the elastic in place.


On the outside of the bra cup, stitch in the ditch where the elastic is pinned. A zipper foot will be helpful here.


Then go back to the inside of the cup and trim the elastic close to the stitching. Use a little Fray-Check, if you like. All done!

Now, if your bra doesn't have that handy plastic ring, you can still probably convert it. This bra just had a continuous strap from cup to back. First cut the strap about 1" above the cup, then put the bottom half of the nursing clasp on the strap and fold it to the back to create a loop. Stitch in place.


If you don't mind sacrificing some of the length of your bra strap, you can just do likewise to the top part of the strap. However, if you want to keep its maximum length, cut a short length of elastic or ribbon to create a loop. Thread the top of the nursing clasp through the elastic, then sandwich the cut end of the strap between the ends of the elastic loop. Stitch in place, then proceed as in the tutorial above.

I hope you find this useful! I've been "test-driving" the models and they are super-comfortable. I can't feel the elastic inside the cup at all. Vive la breastfeeding! ;-)

Wednesday, October 17, 2012

"As giddy as a baby on a swing..."


One of the absolute best things about having two children is watching them together. I love seeing Lavinia's joy when Edmund talks to her or plays with her. (With a big brother of my own, well do I remember that sisterly adoration.) It really wrings at my heart! He is not always all tenderness toward her, but when he is sweet, he is really really sweet. Today, he was anxious to push Lavinia in the swing, even helping her little fingers grasp the ropes so she could hold on. The light in her eyes speaks for itself.

Tuesday, September 18, 2012

Red shoes for fall


Lavinia's ballet flats: handmade gift from Shannon
Edmund's high-top Converse sneakers: Kohls.com (thanks to my mom for her Kohl's cash!)

Sunday, September 9, 2012

Baby jeans

Earlier in the year I bought some "jeggings" fabric from Jo-Ann Fabrics to replace a ragged maternity panel on some thrifted jeans. I didn't use the entire length so I kept the remnant to make some baby jeans down the road. Now that we are getting a few cooler days here and there, the time has come!

[My children have both suffered from silly (but cute) bald patches on the back of their heads,
until they learn to sit up on their own and the hair can grow in!]

I whipped these up yesterday in no time at all. I laid out a pair of Lavinia's leggings on top of the fabric, then cut around the front and back pieces with about a 1/4" seam allowance added. I topstitched them to create faux jeans details (front and back pockets, a fly, flat-felled seams, and a back yoke). They fit her perfectly and look adorable! Instant gratification!

Sunday, August 26, 2012

Blue chambray shirtwaist dress


Here's my third and final incarnation of Simplicity 2246! It's time to move on to a new shirtdress pattern after this, methinks. This one is really just the bodice with a waistband and gathered dirndl skirt spliced on. Because the buttons no longer extend below the waist, I added a side zipper so I could get in and out of the dress.

This dress took me FOR. EVER. because I had this harebrained idea that I should try to learn a new sewing skill with each project. So, I decided to do topstitching, and do it right! At first I tried threading my needle with two threads, which gave the desired decorative effect, but I could not get the tension to stay even between both threads. After ripping out the same seam three times, I gave up and bought a topstitching needle (basically a size 14, with a larger eye) and topstitching thread (thicker than all-purpose thread).


I also took my time with the finishing details on the inside of the dress. I could almost wear it inside out! All of the seams are flat-felled, with the exception of the sleeve seams and the left bodice seam that has the zipper, which are both serged. (It is possible to flat-fell sleeves to a bodice, but this requires setting in the sleeves before sewing the side seams, and I uh, forgot to do that).

Despite all the extra work, I really did enjoy sewing this dress. It's a pretty classic fabric and style, and I think I'll be able to accessorize it many different ways. The sleeve length and full skirt remind me of the late '50s or early '60s, so it has a bit of the "vintage housedress" feel. With a cardigan, it should be a good transition into fall.

Friday, August 24, 2012

Vintage children's clothes

My mom has been helping a friend sort through and clean out her parents' house. This week she brought home a bag full of vintage children's clothes that she knew I'd enjoy seeing. I quickly snapped a photo of all the wonderful fabrics and prints:


There was a golden brown and pink girl's dress, made of real silk, from the 1920s. Lots of cute baby rompers. Most incredible of all was a girl's petticoat from the 1950s which had an inflatable inner tube sewn into a casing for extra flare! I'd never heard of such a thing. My favorite dress was a simple little '50s sundress, printed with rosebuds (on the left in the picture).

My mom's friend has yet to go through the clothes and decide what she wants to keep, so we'll be returning the bag to her. But it was lots of fun to take a small peek at what girls wore in the past!

Tuesday, August 21, 2012

A boy and his Puddleduck

One day, back in Indiana, Douglas and Edmund were walking around our apartment complex and stopped to befriend an older single lady. When Edmund admired her cheap plastic garden duck, she presented it to him as a gift. I confess I rolled my eyes when they brought it back. In my (well-intentioned, but perhaps over-zealous) drive to keep our lives free of clutter and junk, I thought it would end up in the dumpster in a few days.


However, I was proved wrong when Edmund really enjoyed playing with Jemima, as we call her. He treated her almost like a doll -- feeding her, putting her to bed, and meting out discipline.


Since our move, she's been residing in a box. During a recent retrieval trip to our storage unit, I came across Jemima and rescued her. She now happily resides in the herb garden.
